How To Remove Ads By Download N Save
Download n'Save is an adware program that will display their own ads on eBay,Amazon,Walmart and other the web pages that you are visiting.These advertisements will be shown as boxes containing various coupons that are available or as underlined keywords, which when clicked will display an advertisement that states it is brought to you by Download n'Save.

Download n'Save got on your computer after you have installed another program that had bundled in their installer the Download n'Save adware.
You should always pay attention when installing software because often, a software installer includes optional installs, such as this Download n'Save. Be very careful what you agree to install. Always opt for the custom installation and deselect anything that is not familiar, especially optional software that you never wanted to download and install in the first place. It goes without saying that you should not install software that you don't trust.
Download n'Save – Adware Removal Instructions
STEP 1 : Uninstall Download n'Save from your computer
Download n'Save has installed a program called Download n'Save Toolbar on your computer which we will need to uninstall.
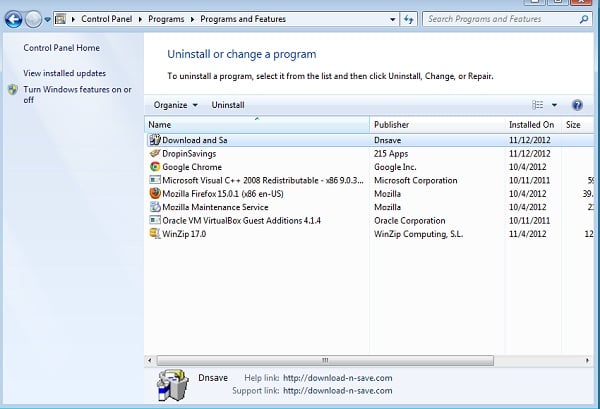
- To uninstall Download n'Save program from your computer,click the Start button,then select Control Panel, and click on Uninstall a program. (Add or Remove Programs for Windows XP)
- Search and uninstall Download and save program from your computer.
STEP 2 : Remove the Download n'Save residual damage from your browser
Remove Download n'Save from Internet Explorer
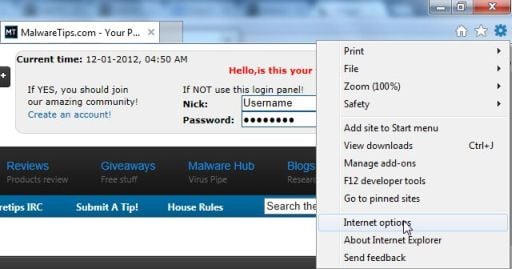
- Open Internet Explorer,then click on the gear icon
![[Image: icongear.jpg]](https://malwaretips.com/images/removalguide/icongear.jpg) (Tools for Windows XP users) at the top (far right) and click again onInternet Options.
(Tools for Windows XP users) at the top (far right) and click again onInternet Options.
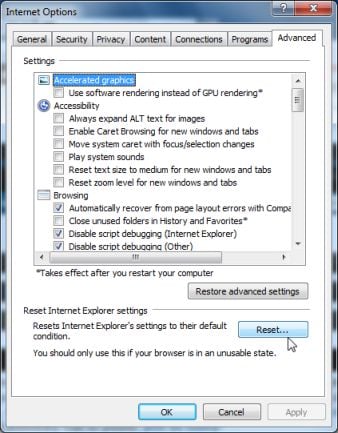
- Now in the Internet Options dialog box, click on theAdvanced tab, clickReset.
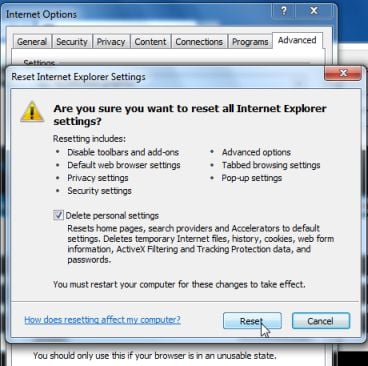
- In the Reset Internet Explorer settings section. ClickReset again in the information dialog box.
- When Internet Explorer finishes resetting, click Close in the confirmation dialogue box and then clickOK.
- Close and open Internet Explorer again.
Remove Download n'Save from Mozilla Firefox
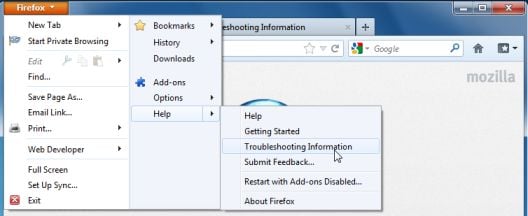
- At the top of the Firefox window, click theFirefox button, go over to the Help sub-menu (onWindows XP, click the Help menu at the top of the Firefox window) and selectTroubleshooting Information.
- Click theReset Firefox button in the upper-right corner of the Troubleshooting Information page.
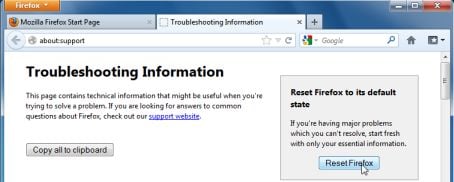
- To continue, clickReset Firefox in the confirmation window that opens.
- Firefox will close and be reset. When it's done, a window will list the information that was imported. Click Finish and Firefox will open. That's it – you're done!
Remove Download n'Save from Google Chrome
- Remove Download n'Save extensions from Google Chrome.
Click the Chrome menu on the browser toolbar,selectTools and then click onExtensions.In theExtensions tab,remove (by clicking on the Recycle Bin) the Download and sa extension from your computer.

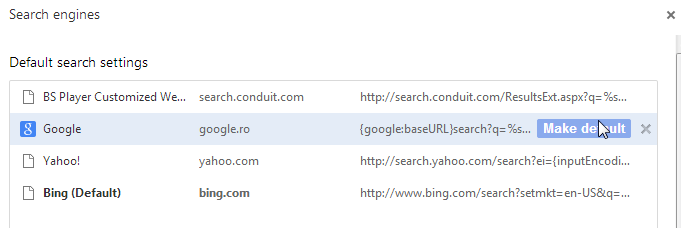
- Replace the Download n'Save with Google as default search engine.
Click the Chrome menu ,then select Setttings and click onManage search engines in the Search section.
Select Download n'Save from the list and click theX that appears at the end of the row, then selectGoogle (Default) from the list and make it your default search engine.
STEP 3: Remove Download n'Save registry keys with AdwCleaner.
- You can download AdwCleaner from the below link.
ADWCLEANER DOWNLAOD LINK (This link will automatically download AdwCleaner on your computer) - Before starting this utility,close all open programs and internet browsers.
- Double click onadwcleaner.exe to run the tool.
- Click onDelete,then confirm each time withOk.
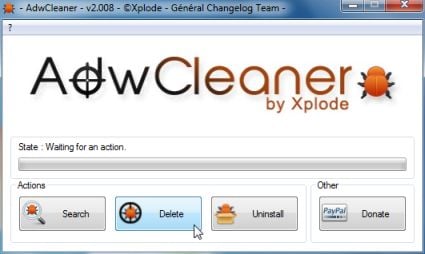
- Your computer will be rebooted automatically. A text file will open after the restart.
- NEXT,double click onadwcleaner.exe to run the tool.
- Click onUninstall,then confirm withyes to remove this utility from your computer.
STEP 4: Remove Download n'Save files with Malwarebytes Anti-Malware FREE
- You can download Malwarebytes Anti-Malware from the below link.
MALWAREBYTES ANTI-MALWARE DOWNLOAD LINK (This link will open a download page in a new window from where you can download Malwarebytes Anti-Malware Free) - Start the Malwarebytes' Anti-Malware installation process by double clicking on mbam-setupfile.
![Malwarebytes Anti-Malware Installer [Image: Malwarebytes Installer]](https://malwaretips.com/images/removalguide/malwarebytes-setup.png)
- When the installation begins, keep following the prompts in order to continue with the setup process. Do not make any changes to default settings and when the program has finished installing, make sure you leave both the Update Malwarebytes' Anti-Malware and Launch Malwarebytes' Anti-Malware checked. Then click on the Finish button. If Malwarebytes' prompts you to reboot, please do not do so.
![Malwarebytes last setup screen [Image: Finishing Malwarebytes installation]](https://malwaretips.com/images/removalguide/update-malwarebytes.png)
- Malwarebytes Anti-Malware will now start and you'll be prompted to start a trial period , please select 'Decline' as we just want to use the on-demand scanner.
![Decline trial period in Malwarebytes Anti-Malware [Image: Decline Malwarebytes trial]](https://malwaretips.com/images/removalguide/malwarebytes-trial.png)
- On the Scanner tab,select Perform full scan and then click on the Scanbutton to start scanning your computer.
![Perform a Full System Scan with Malwarebytes Anti-Malware [Image: Starting a full system sca]](https://malwaretips.com/images/removalguide/start-scan-malwarebytes.png)
- Malwarebytes' Anti-Malware will now start scanning your computer for Download n'Save malicious files as shown below.
![Malwarebytes Anti-Malware scanning for [Image: Malwarebytes scanning for malicious files]](https://malwaretips.com/images/removalguide/scan-malwarebytes.png)
- When the scan is finished a message box will appear, click OK to continue.
![Malwarebytes when the system scan has finished [Image: Malwarebytes scan results]](https://malwaretips.com/images/removalguide/results-malwarebytes.png)
- You will now be presented with a screen showing you the malware infections that Malwarebytes' Anti-Malware has detected.Please note that the infections found may be different than what is shown in the image.Make sure that everything is Checked (ticked) and click on the Remove Selected button.
![Removing the infections found by Malwarebytes [Image: Infections found by Malwarebytes]](https://malwaretips.com/images/removalguide/detection-malwarebytes.png)
STEP 5: Double check your system for any left over infections with HitmanPro
- You can download the latest version of HitmanPro from the below link.
HITMANPRO DOWNLOAD LINK (This link will open a download page in a new window from where you can download HitmanPro) - Double click on the previously downloaded fileto start the HitmanPro installation.
![HitmanPro Installer [Image: HitmanPro Icon]](https://malwaretips.com/images/removalguide/hpro1.png)
- Click on Next to install HitmanPro on your system.
![HitmanPro installation process [Image: Starting HitmanPro]](https://malwaretips.com/images/removalguide/hitmanpro36-start.png)
- The setup screen is displayed, from which you can decide whether you wish to install HitmanPro on your machine or just perform a one-time scan, select a option then click on Next to start a system scan.
![HitmanPro setup options [Image: HitmanPro installation screen]](https://malwaretips.com/images/removalguide/hitmanpro36-installation.png)
- HitmanPro will start scanning your system for malicious files as seen in the image below.
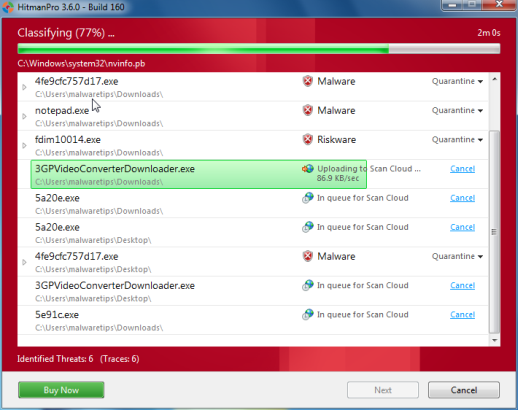
- Once the scan is complete,you'll see a screen which will display all the malicious files that the program has found.Click on Nextto remove this malicious files.
![HitmanPro displaying scan results [Image: HitmanPro scan results]](https://malwaretips.com/images/removalguide/hitmanpro36-results.png)
- Click Activate free license to start the free 30 days trial and remove the malicious files.
![Activate the HitmanPro free 30 days trial to remove any detected infections [Image: Activate HitmanPro license]](https://malwaretips.com/images/removalguide/hitmanpro36-activation.png)
If you are still experiencing problems while trying to remove Download n'Save from your machine, please start a new thread in our Malware Removal Assistance forum.
How To Remove Ads By Download N Save
Source: https://malwaretips.com/blogs/download-n-save-ads/
Posted by: charleswitternew.blogspot.com

0 Response to "How To Remove Ads By Download N Save"
Post a Comment